Feeling a bit stiff picking something up off the floor? Does merely thinking about performing a deep squat aggravate your hips? Age is often blamed for tight hips and hamstrings — muscle groups that often lack mobility. Our joints stiffen and muscles weaken naturally as we get older, but regular maintenance can greatly decrease these age-related effects.

The foam roller is an essential tool for working on tight muscles, releasing tension and improving mobility. Foam rolling is a form of soft tissue work, meaning direct physical action on muscles and connective tissue. Soft tissue work (which also includes massage) is an important technique for preventing injury, recovering from workouts, and increasing mobility, but it should be accompanied by strength, stability and mobility exercises as well.
Here are four foam rolling moves that work on some of the major muscle groups affecting hip and hamstring mobility, especially in active older adults.
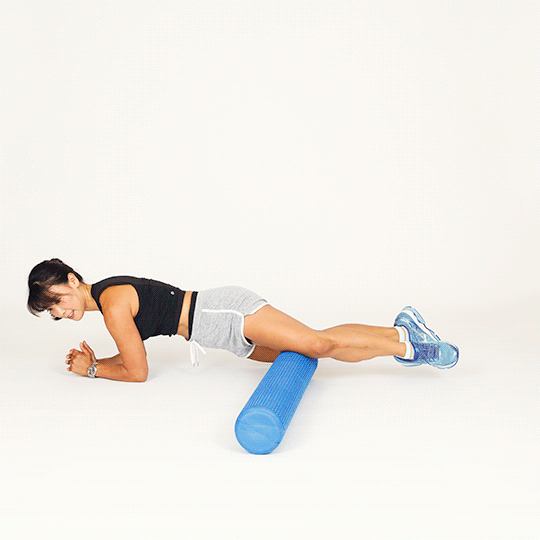
1. Hamstrings
Foam rolling your hamstrings may be especially beneficial after engaging in lower body-intensive activities like running or racquet sports. It may also prevent delayed onset muscle soreness in this muscle group after performing deadlifts or other hamstring dominant weight lifting exercises.

Bright Photography
Sit on the foam roller with the roller placed sideways under your glutes. Place your hands on the floor behind you, hands facing forwards or to the side. With straight legs, lean onto your hands and roll the foam roller under your hamstrings, feet leaving the ground. Slowly roll the roller backwards and forwards along the hamstrings muscle. If you’d like more pressure, raise one leg so more weight is on the leg left on the roller. Try to keep good posture throughout with your head in alignment with your spine.
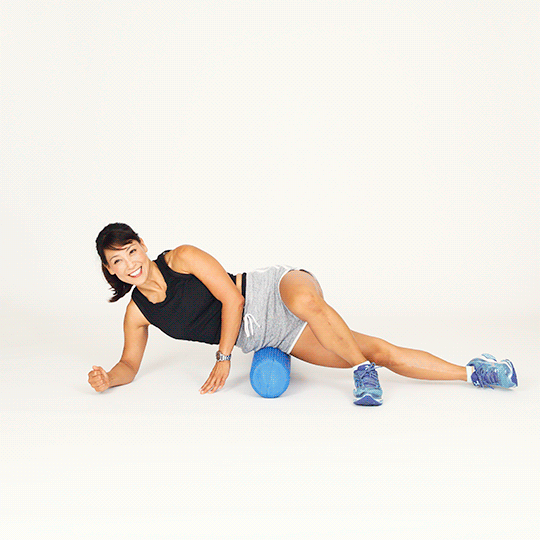
2. Adductors
The adductors are your inner thigh muscles. If you play tennis, pickleball or participate in other sports that require lots of lateral movement, these muscles will likely need some soft tissue work.
Supporting yourself on your hands and knees, place the foam roller to the left of your left leg. With your knee bent, place your left inner thigh on the roller. Your right leg will be extended behind you on the floor. Now lower down onto your forearms.
Because of the somewhat awkward position your body is in, it’s usually simplest to roll each half of the adductor muscle group separately. Start by rolling from just above the knee to halfway up your thigh. Complete slow repetitions, pausing on any sore spots, then reposition the roller and roll from mid-thigh to the groin. Make sure you keep your core muscles braced throughout this movement, to prevent your lower back from hyperextending.


3. Tensor Fasciae Latae (TFL)
The tensor fasciae latae — or TFL — is a small muscle that originates in the upper anterior (front) portion of the pelvis and attaches to the IT band. The TFL can get strained in runners.
Assume a side-lying position with the foam roller placed under the upper thigh of the right leg. Ensure the roller is placed just below your pelvis. Rest your right forearm on the floor. Bend your left leg so your left foot rests on the floor in front of your extended right leg. You won’t need to roll very far because this muscle is relatively small; a quarter of the way down your thigh will suffice. Use both hands on the floor for less pressure on the TFL, or one hand on the floor for more pressure. Make sure you don’t roll directly over your hip bone.
4. Quadriceps
Many runners have tight quad muscles which can set them up for injuries and sub-par performance. Rolling your quads can also be useful after engaging in activities such as cycling, hiking or training your lower body by lifting weights.

From a kneeling position, place the foam roller under your legs, with most of your body weight supported by your forearms on the floor. Roll slowly along the quadriceps muscles to release tension. You can lean from side to side to target the inner and outer portions of the quadriceps muscles. Try to prevent your back from arching throughout the movement, and keep your head in line with your spine. Make sure to roll just the quadriceps muscles and not the knees.
Trainer’s Tip
Foam roll in a way that works best for you; there’s no one right way to do it. I start my older clients with about 30 seconds of slow and controlled rolling on each muscle group. Over time, their muscles release tension and foam rolling becomes more comfortable; I’ll then increase this to about 60 seconds per muscle group (per side, where applicable).


