Do you catch yourself in a slouched posture, with your shoulders falling forward and your upper back rounding? Are you noticing some tight spots in your shoulder or upper back muscles? When we don’t perform regular maintenance work on the muscles in our back, shoulders, and chest, they can become weak and stiff, leading to the dreaded “slumped forward” posture.

Time spent sitting — especially at the computer — often leads to tight pectoral (chest) muscles, and a rounded upper back. Normal age-related changes can also lead to increased stiffness in our joints. These four foam rolling moves will decrease muscle tension and increase mobility in your upper back, preventing soreness and improving your posture.
4 Foam Rolling Moves to Ease Stiff Joints
1. Upper Back Option A
Every client I’ve ever trained who has foam rolled the upper back has noticed at least some areas of tightness. Use this exercise to massage sore upper back muscles.

Bright Photography
Position the foam roller lengthwise under your mid-back. Support your head with your hands, without pulling or pushing on your neck. Bend your knees and place your feet flat on the floor. Lift your hips off the floor. Roll slowly from your mid-back upward toward your head, stopping below the neck. Use your feet on the floor to control the motion and pressure, and tilt your body slightly from side to side to access the upper back muscles from different angles.


2. Upper Back Option B
Here’s a variation of the previous upper back move, which targets the rhomboids. Your rhomboids squeeze your shoulder blades together.

Lie on the foam roller lengthwise, with your head at one end and your tailbone at the other end. Bend your knees and place your feet flat on the floor. With your elbows bent and hands near your head, carefully roll slightly from left to right, focusing on the muscles in your upper back and between your shoulder blades. Make sure you don’t twist your spine as you roll; move your body as one unit. Try lifting your head slightly to access your upper back muscles from a different angle.
3. Thoracic Extensions
An excessive rounding of the upper back due to bad posture is called postural kyphosis. This leads to a “hunchback” appearance with the head jutting forward. Kyphosis is usually accompanied by muscle weakness, stiffness, and pain. If not corrected, these symptoms usually remain constant and often become progressively more severe with age. Working on mobilizing your thoracic spine (upper back area) will help to prevent these problems, and it’ll help to treat them if you do.

Place the foam roller crosswise under your upper back. Bend your knees and place your feet flat on the ground. Place your hands behind your head and move your elbows toward each other as far as you can. Slowly lean backward, dropping your head toward the floor. Slowly roll back up to the starting position and repeat the move. Make sure you keep your abdominals tightened and your pelvis in a neutral position so you don’t excessively arch your lower back.
4. Chest Stretch
Tight pectoral muscles are common in older adults who spend a lot of time sitting (even if you’re regularly active). When this muscle group becomes too tight, it can pull your shoulders forward, leading to potential shoulder injuries and a slumped appearance. This exercise on the foam roller stretches the pectoral muscles and helps return them to normal function. It’s one of my favorites because it takes no effort at all.
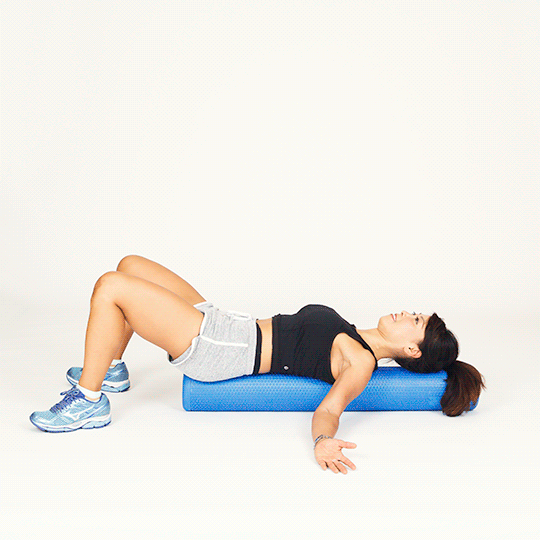
Lie lengthwise on the foam roller with your tailbone at one end and your head at the other. Bend your knees and place your feet flat on the floor. With straight arms, reach out to your sides, resting your forearms and the backs of your hands on the floor (palms should be facing up). You’ll feel a stretch in your chest muscles. You can also try slowly moving your arms in a “snow angel” motion toward your head, keeping your hands on the floor to deepen the stretch.
Trainer’s Tip
There’s no “best” time to foam roll; you can do these foam rolling exercises whenever it suits you. I’ll often use foam rolling as a warm-up or cool-down (or both) for my clients’ strength workouts, but you can also foam roll throughout the day, especially if you spend a lot of time sitting. Spending a total of 5-10 minutes a day doing the above moves will lead to noticeable improvements in posture and muscle tension in only a week.


